今日は別の勉強をするつもりだったが結局やってしまった。恐るべし Rails。
Git で管理
1日目はファイルを変更したときの差分を取るために、「.bak というサフィックスを付けてファイルコピーして diff を取る」というイケてないことをしていた。今後は変更履歴をきちんと残すため、Git で管理することにする。
一旦アプリケーションを作り直す。
$ rails new abunaideka
$ cd abunaideka
Git の管理下におく。
$ git init.gitignore は、Github 標準の Rails 用のものをいただいてくる。
$ vi .gitignore*.rbc
*.sassc
.sass-cache
capybara-*.html
.rspec
/.bundle
/vendor/bundle
/log/*
/tmp/*
/db/*.sqlite3
/public/system/*
/coverage/
/spec/tmp/*
**.orig
rerun.txt
pickle-email-*.html初期 commit を作成する。これで git diff すれば差分を簡単に得ることができるようになる。
$ git add -Av
$ git commit -m "First commit"
1日目と同じ構造の MVC を Scaffolding で生成する (今日は SQLite のままで)。
$ rails generate scaffold policeman name:string grade_id:integer sex:string birthday:date hometown:stringどんなファイルが追加されたのか確認してみる。
$ git status# On branch master
# Changes not staged for commit:
# (use "git add <file>..." to update what will be committed)
# (use "git checkout -- <file>..." to discard changes in working directory)
#
# modified: config/routes.rb
#
# Untracked files:
# (use "git add <file>..." to include in what will be committed)
#
# app/assets/javascripts/policemen.js.coffee
# app/assets/stylesheets/policemen.css.scss
# app/assets/stylesheets/scaffolds.css.scss
# app/controllers/policemen_controller.rb
# app/helpers/policemen_helper.rb
# app/models/policeman.rb
# app/views/policemen/
# db/migrate/
# test/fixtures/policemen.yml
# test/functional/policemen_controller_test.rb
# test/unit/helpers/
# test/unit/policeman_test.rb
no changes added to commit (use "git add" and/or "git commit -a")ふむふむ、わかりやすい。
DB に反映して git commit しておく。
$ rake db:migrate
$ git add -Av
$ git commit -m "Add policeman by scaffolding"
これで1日目とだいたい同じ状態まで追いついた。
Twitter Bootstrap の適用
Scaffolding で生成されるビューは質素だが、見た目がカッコ良くなればさらにやる気が出るんじゃないか? ということで、デザインを変更してみる。手っ取り早く Twitter Bootstrap を使わせてもらう。
Gemfile を編集して、必要なライブラリを追加する。せっかくなので Git で差分を示す。
$ git diff Gemfilediff --git a/Gemfile b/Gemfile
index 9a2ccae..c3f62e8 100644
--- a/Gemfile
+++ b/Gemfile
@@ -15,9 +15,11 @@ group :assets do
gem 'coffee-rails', '~> 3.2.1'
# See https://github.com/sstephenson/execjs#readme for more supported runtime
- # gem 'therubyracer', :platforms => :ruby
+ gem 'therubyracer', :platforms => :ruby
gem 'uglifier', '>= 1.0.3'
+ gem 'less-rails'
+ gem 'twitter-bootstrap-rails'
end
gem 'jquery-rails'bundle install し、ファイルを配置して、ビューのレイアウトテンプレート (application.html.erb) に反映する。
$ bundle install
$ rails generate bootstrap:install
$ rails generate bootstrap:layout application fluid
    conflict  app/views/layouts/application.html.erb
Overwrite /Applications/MAMP/htdocs/abunaideka/app/views/layouts/application.html.erb? (enter "h" for help) [Ynaqdh] Y
Scaffolding で生成したビューのテーブルやリンク文字列に Bootstrap を適用する。class を追加するだけ。この他の装飾は公式ドキュメントの Base CSS とか Components を参照のこと。
$ git diff app/views/policemen/index.html.erbdiff --git a/app/views/policemen/index.html.erb b/app/views/policemen/index.html
index c37aa20..ae7bcfc 100644
--- a/app/views/policemen/index.html.erb
+++ b/app/views/policemen/index.html.erb
@@ -1,6 +1,6 @@
<h1>Listing policemen</h1>
-<table>
+<table class="table">
<tr>
<th>Name</th>
<th>Grade</th>
@@ -19,9 +19,9 @@
<td><%= policeman.sex %></td>
<td><%= policeman.birthday %></td>
<td><%= policeman.hometown %></td>
- <td><%= link_to 'Show', policeman %></td>
- <td><%= link_to 'Edit', edit_policeman_path(policeman) %></td>
- <td><%= link_to 'Destroy', policeman, method: :delete, data: { confirm: 'Ar
+ <td><%= link_to 'Show', policeman, class: "btn" %></td>
+ <td><%= link_to 'Edit', edit_policeman_path(policeman), class: "btn" %></td
+ <td><%= link_to 'Destroy', policeman, method: :delete, data: { confirm: 'Ar
</tr>
<% end %>
</table>WEBrick を起動する (※ 起動しっぱなしだった場合は一旦停止する)。
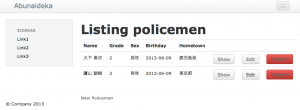
$ rails serverで、どんな感じになったら確認してみると…… それっぽくなっている! (Destroy ボタンの文字が黒いのが気になるが)
あとは “ズルいデザイン” というのが流行っているようなので、試してみると良いかも知れない。
今日はここまで。


コメント