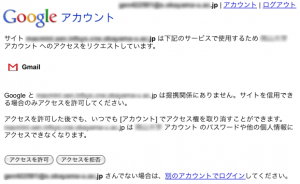
PHP 5.3 + PEAR HTTP_OAuth により Google Apps で OAuth 認証を行なう方法のメモ。

まず,Google アカウント にサイトを登録し,OAuth Consumer Secret を発行してもらっておく。
用意ができたら,実際にプログラムを作っていく。
まず,設定ファイル (config.inc.php) を作成する。
<?php

define('BASE_DIR',          'http://<このプログラムの設置ディレクトリ>');
define('CONSUMER_KEY',      '<取得した CONSUMER KEY>');
define('CONSUMER_SECRET',   '<取得した CONSUMER_SECRET>');
define('GET_REQUEST_TOKEN', 'https://www.google.com/accounts/OAuthGetRequestToken');
define('GET_AUTHORIZE',     'https://www.google.com/accounts/OAuthAuthorizeToken');
define('GET_ACCESS_TOKEN',  'https://www.google.com/accounts/OAuthGetAccessToken');
define('CALLBACK_URL',      BASE_DIR.'callback.php');

$additional = array(
	'scope' => '<scope>',
	'hd' => '<Google Apps ドメイン名>'
);

require_once('HTTP/OAuth/Consumer.php');

// SSL でエラーが出るので証明書の確認を無効化
$http_request = new HTTP_Request2();
$http_request->setConfig('ssl_verify_peer', false);
$consumer_request = new HTTP_OAuth_Consumer_Request;
$consumer_request->accept($http_request);

$oauth = new HTTP_OAuth_Consumer(CONSUMER_KEY, CONSUMER_SECRET);
$oauth->accept($consumer_request);

session_start();
<scope> には,利用するサービスの API の URL を指定する。例えば Gmail なら https://mail.google.com/mail/ となる。半角スペースで区切って複数指定することもできる。
次に,OAuth 認証を行なうプログラム (oauth.inc.php) を作成する。
<?php

if (empty($_SESSION['AUTH_TOKEN']) || empty($_SESSION['TOKEN_SECRET'])) {
	try {
		$oauth->getRequestToken(GET_REQUEST_TOKEN, CALLBACK_URL, $additional);
		$_SESSION['callback_token'] = $oauth->getToken();
		$_SESSION['callback_secret'] = $oauth->getTokenSecret();
		$redirect = $oauth->getAuthorizeUrl(GET_AUTHORIZE, $additional);

		$_SESSION['REQUEST_URI'] = $_SERVER['REQUEST_URI'];

		header('location: '.$redirect);
	} catch (Exception $e) {
		echo($e->getMessage());
	}
	exit();
}

$oauth->setToken($_SESSION['AUTH_TOKEN']);
$oauth->setTokenSecret($_SESSION['TOKEN_SECRET']);
そして,OAuth 認証が成功したあとのコールバックによる戻り先 (callback.php) を作成する。
<?php

require_once('config.inc.php');

$oauth->setToken($_SESSION['callback_token']);
$oauth->setTokenSecret($_SESSION['callback_secret']);

try {
	$oauth->getAccessToken(GET_ACCESS_TOKEN, $_GET['oauth_verifier']);
	$_SESSION['AUTH_TOKEN']   = $oauth->getToken();
	$_SESSION['TOKEN_SECRET'] = $oauth->getTokenSecret();
} catch (Exception $e) {
	echo($e->getMessage());
	exit();
}

header('location: '.$_SESSION['REQUEST_URI']);
最後にメインのプログラム (index.php) を作成する。
<?php

require_once('config.inc.php');
require_once('oauth.inc.php');

/* ここから下にコードを書いていく */
例えば,Gmail の新着メールを取得する場合は次のようになる。
try {
	$response = $oauth->sendRequest('https://mail.google.com/mail/feed/atom/');
} catch (Exception $e) {
	echo($e->getMessage());
	exit();
}

echo('<pre>');
echo htmlspecialchars($response->getBody());
これにより,次のような結果が返ってくる。
<?xml version="1.0" encoding="UTF-8"?>
<feed version="0.3" xmlns="http://purl.org/atom/ns#">
<title>Gmail - Inbox for <メールアドレス></title>
<tagline>New messages in your Gmail Inbox</tagline>
<fullcount>0</fullcount>
<link rel="alternate" href="http://mail.google.com/mail" type="text/html" />
<modified>2011-01-27T13:36:19Z</modified>
</feed>
認証済みのメールアドレスは次のような関数で取得できる。
function get_mailaddr($oauth) {
	try {
		$response = $oauth->sendRequest('https://mail.google.com/mail/feed/atom/');
	} catch (Exception $e) {
		echo($e->getMessage());
		exit();
	}

	$xmlStr = $response->getBody();
	$xmlData = @simplexml_load_string($xmlStr);
	$title = @$xmlData->title;

	if (!preg_match('/([^\s]+@[^\s]+)/', $title, $matches)) {
		return false;
	}

	return $matches[1];
}参考ページ
- OAuth API Reference – Google code
- PHP(PEAR)でOAuth経由でGoogle Latitude APIを使う – konisimple log
- GoogleのOAuthを試してみた – スマートネットワーク 開発ブログ


コメント